nikon em user manual
Nikon EM User Manual: A Comprehensive Guide
Welcome! This detailed guide unlocks the full potential of your Nikon EM, offering a comprehensive exploration of its features and operation.

Discover how to utilize this classic camera, from film loading to mastering manual and automatic exposure modes, ensuring stunning photographic results.
Explore service manuals, repair resources, and PDF downloads for optimal camera maintenance and longevity, alongside compatible lens information.
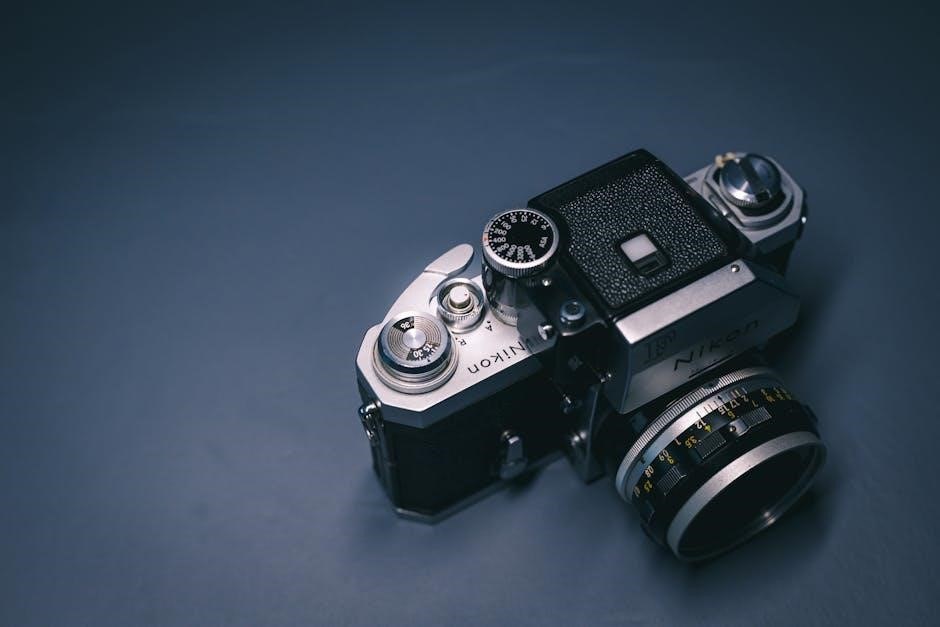
The Nikon EM, released in 1979, represents a pivotal point in Nikon’s history, offering a more affordable entry into the world of Nikon’s renowned SLR systems. This camera, while often overshadowed by its siblings like the FM and FE, provides a robust and reliable platform for both novice and experienced photographers.
Designed with user-friendliness in mind, the EM features a simplified control layout and an electronic shutter, making it a unique offering within the Nikon range. It’s particularly well-suited for those transitioning from automatic cameras or seeking a lightweight, dependable film camera.
This manual aims to demystify the Nikon EM, guiding you through its features, operation, and maintenance, ensuring you can fully appreciate its capabilities and capture beautiful images for years to come. Explore its compatibility with Series E and AI-type Nikkor lenses!
Key Features and Specifications
The Nikon EM boasts a horizontally-traveling metal focal-plane shutter, offering speeds from 2 seconds to 1/1000th of a second, plus Bulb mode. Its built-in electronic exposure meter utilizes a CdS photocell for accurate readings, supporting both aperture-priority auto exposure and full manual control.
Key specifications include compatibility with Nikon Series E and AI-type Nikkor lenses, a standard 5-way hot shoe for flash synchronization, and a film speed range of ISO 12 to ISO 3200. The camera operates on a 4LR44/PX28 battery, powering the meter and electronic shutter.
Its compact and lightweight design, coupled with its user-friendly interface, makes the Nikon EM an excellent choice for photographers seeking a blend of simplicity and quality.
Understanding the Camera Body
The Nikon EM’s body is constructed with a durable, yet lightweight, plastic shell, contributing to its portability. Examining the front reveals the lens mount, self-timer button, and depth-of-field preview lever. The rear panel houses the film rewind crank, film advance lever, and controls for exposure compensation and mode selection.
On top, you’ll find the shutter speed dial, film speed dial, and the on/off switch integrated with the shutter release. The FB-E compartment case provides additional protection and accommodates a 50mm lens. Familiarizing yourself with these components is crucial for efficient operation.
Understanding the layout enhances your control and allows for seamless adjustments during shooting.
Front View: Controls and Components
The Nikon EM’s front panel is dominated by the Nikon F-mount, accepting Series E and AI-type Nikkor lenses. To the right of the lens mount is the self-timer button, initiating a 10-second delay for self-portraits or group shots. Adjacent to this, the depth-of-field preview lever allows you to visually assess the area in focus at the selected aperture.
Observe the lens release button, essential for mounting and dismounting lenses. The front also features the lens index mark, aiding in proper lens alignment. These controls are intuitively positioned for easy access during operation.
Understanding their function is key to mastering your Nikon EM.
Rear View: Controls and Components
The rear panel of the Nikon EM houses essential controls for film handling and exposure settings. The film rewind crank and release button are prominently featured, facilitating easy film rewinding after shooting. The film door latch allows quick access to the film chamber for loading and unloading.
You’ll find the frame counter, displaying the number of exposures taken. The shutter release button, coupled with the depth-of-field preview lever, controls image capture. The battery chamber cover provides access for battery replacement, crucial for powering the light meter.
Familiarize yourself with these components for seamless operation.
Top View: Controls and Components
The Nikon EM’s top deck features the critical controls for setting shooting parameters. The shutter speed dial allows selection from a range of speeds, including automatic modes. The mode dial selects between automatic and manual exposure, offering creative control. The film advance lever smoothly transports film after each exposure.
The hot shoe accommodates external flash units for enhanced lighting options. The PC terminal provides an alternative connection for older flash models. The exposure compensation dial fine-tunes exposure in automatic modes.
Understanding these controls is key to mastering the Nikon EM’s capabilities.
Loading Film into the Nikon EM
Loading film into the Nikon EM is a straightforward process. First, locate the film chamber release on the camera’s bottom. Open the back cover by sliding the latch. Insert the film cassette into the left-side chamber and pull the film leader across to the take-up spool on the right.
Ensure the film perforations engage with the sprockets. Advance the film using the film advance lever, checking that the rewind knob rotates, indicating film is being taken up. Close the back cover securely.
The camera is now ready for shooting; the frame counter will display the number of exposures remaining.
Setting the Shutter Speed
Adjusting shutter speed on the Nikon EM is crucial for controlling motion and exposure. The shutter speed dial, located on the top panel, allows selection from various speeds, including automatic modes. When set to ‘AUTO’, the camera determines the optimal speed.
For manual control, select speeds from 1/90 sec to 1/500 sec, or utilize ‘B’ (bulb) for long exposures. If the shutter fails to operate, shift the mode selector from ‘AUTO’ to ‘M90’ – this sets a default speed of 1/90th of a second.
Remember, slower speeds blur motion, while faster speeds freeze it.
Shutter Speed Dial Explained
The Nikon EM’s shutter speed dial offers both automatic and manual control. In ‘AUTO’ mode, the camera calculates the correct speed based on light meter readings. Manual settings range from 1/90 to 1/500 of a second, providing creative control over motion blur and image sharpness.
The ‘B’ setting enables bulb exposures, keeping the shutter open as long as the shutter release button is pressed. A lock prevents accidental dial movement. If the shutter doesn’t function, switching to ‘M90’ sets a fixed speed of 1/90th second, often resolving operational issues.
Understanding these settings is key to mastering exposure.
Using Automatic Exposure Modes
The Nikon EM offers shutter-priority automatic exposure. Select a desired shutter speed on the dial, and the camera automatically sets the appropriate aperture for correct exposure, as measured by the built-in light meter. This is ideal for controlling motion – freezing action with fast speeds or creating blur with slower ones.
Ensure the mode selector is set to ‘AUTO’ for this function to operate. The viewfinder displays indicators confirming automatic operation. Remember to check the light meter reading to ensure sufficient light for accurate exposure. Automatic modes simplify shooting, letting you focus on composition.
Aperture Control and Depth of Field
Aperture, controlled by the lens, dictates the lens opening size. It directly influences depth of field – the area in focus. Larger apertures (smaller f-numbers like f/1.8) create shallow depth of field, ideal for isolating subjects with blurred backgrounds. Smaller apertures (larger f-numbers like f/16) yield greater depth of field, keeping more of the scene sharp.
With the Nikon EM in automatic exposure mode, the camera selects the aperture based on your chosen shutter speed and light conditions. In manual mode, you control both aperture and shutter speed. Understanding this relationship is crucial for creative control over your images.
Focusing Techniques with Nikon Lenses
Achieving sharp focus is paramount for quality images. The Nikon EM utilizes a split-image rangefinder in the viewfinder, aiding precise manual focusing. Rotate the focusing ring on your Nikkor lens until the image in the split-image aligns, indicating critical focus.
The EM is compatible with Nikon Series E and AI-type Nikkor lenses, offering a range of focal lengths and apertures. Practice focusing on subjects at varying distances to develop muscle memory. Remember, accurate focusing relies on steady hands and careful observation through the viewfinder.
Using the Viewfinder for Accurate Focusing
The Nikon EM’s viewfinder is central to precise focusing. It features a split-image rangefinder – two opposing images that must be aligned for sharpness. Rotate the lens focusing ring until these images merge into one cohesive image. This indicates your subject is in critical focus.
Pay attention to the microprism collar surrounding the split-image; it will appear blurry when out of focus and sharpen as you approach accurate focus. Practice with different lenses and lighting conditions to master this technique. Consistent use will build your intuitive focusing skills, resulting in consistently sharp photographs.
Compatible Lenses: Series E and AI-Type Nikkor
The Nikon EM is designed for use with Nikon Series E and AI-Type Nikkor lenses. Series E lenses were specifically engineered for the EM, offering full functionality and excellent performance. AI-Type Nikkor lenses, representing a broader range of options, are also fully compatible, providing expanded creative possibilities.
Other Nikkor lenses may be usable, but compatibility should be verified. Ensure the lens mount is correct and that all features, like aperture control, function as expected. Utilizing compatible lenses guarantees optimal performance and avoids potential issues with metering or operation. Explore the diverse range of Series E and AI lenses to unlock the full potential of your Nikon EM.

Using the Built-in Light Meter
The Nikon EM features a center-weighted, through-the-lens (TTL) metering system. This system accurately measures light levels to assist in achieving proper exposure. The meter reading is displayed in the viewfinder, indicating over or underexposure. Utilize the aperture and shutter speed controls to adjust settings until the meter indicates correct exposure.
Remember that the meter responds to the light reflected from the scene. Consider the subject’s brightness and contrast when interpreting the reading. For challenging lighting situations, bracketing exposures can ensure optimal results. Understanding the meter’s operation is crucial for consistently capturing well-exposed photographs with your Nikon EM.
Troubleshooting Common Issues
A frequent issue is a stuck shutter, often resolved by resetting the operation mode. Switch the selector from AUTO to M90, forcing a 1/90 sec shutter speed. If the camera doesn’t respond, check the battery compartment for corrosion or weak batteries. Ensure correct battery installation; the Nikon EM requires specific battery types.
If the light meter appears inaccurate, verify proper film loading and ISO setting. A malfunctioning meter may indicate a need for professional servicing. Refer to service manuals for detailed repair guidance. Regularly inspect the camera for dust and debris, which can affect mechanical operation.
Resetting Shutter Operation Mode
If the shutter fails to operate, a reset of the shutter operation mode selector is often the solution. This commonly occurs when the camera has been left in AUTO mode for extended periods or experiences a power interruption. Simply switch the selector, located on the camera’s top panel, from the ‘AUTO’ position to ‘M90’.
This forces the shutter to a fixed speed of 1/90th of a second, effectively ‘rebooting’ the system. After resetting, attempt to fire the shutter again. If the issue persists, investigate battery condition and ensure proper film loading. Consult the full owner’s manual for further troubleshooting steps.
Battery Information and Replacement
The Nikon EM utilizes a readily available 4LR44 or equivalent battery to power its electronic functions, including the light meter and automatic exposure modes. Battery life varies depending on usage, but regular film shooters should expect to replace it periodically.
To replace the battery, locate the battery compartment on the camera’s bottom. Open the compartment and carefully remove the old battery, observing the correct polarity (+ and -). Insert the new battery, ensuring proper alignment. A weak battery can cause inaccurate readings or shutter malfunctions, so maintain a fresh spare.
Nikon EM and Accessories
Enhance your Nikon EM experience with a range of compatible accessories. The FB-E Compartment Case, specifically designed for the EM, provides secure storage and convenient carrying, accommodating the camera with a Nikon Series E 50mm f/1.8 lens attached.
Other useful accessories include lens filters for creative effects, a strap for comfortable handling, and additional lenses from the Series E or AI-Type Nikkor lines. Explore options to expand your photographic capabilities and protect your investment. Remember to check compatibility before purchasing any third-party accessories.
The FB-E Compartment Case
The FB-E Compartment Case is a purpose-built accessory designed specifically for the Nikon EM camera. It offers a secure and protective environment for your valuable equipment, shielding it from dust, bumps, and minor impacts during transport and storage.
This case is thoughtfully designed to comfortably accommodate the Nikon EM body with a Nikon Series E 50mm f/1.8 lens already attached, eliminating the need for separate storage. Its compact size makes it ideal for travel and everyday use, ensuring your camera is always ready when inspiration strikes. It’s a practical addition for any EM owner.
Service Manual and Repair Resources
Maintaining your Nikon EM requires access to reliable service information. Factory service manuals, available as PDF downloads, provide detailed instructions for disassembly, repair, and maintenance procedures. These manuals are invaluable for experienced technicians or dedicated enthusiasts undertaking camera restoration.
Resources like Learn Camera Repair offer these manuals, enabling comprehensive troubleshooting and repair. Online communities, such as r/AnalogRepair on Reddit, can also provide valuable support and guidance. Remember to exercise caution when performing repairs and prioritize safety. Proper documentation ensures a successful restoration, preserving the longevity of your classic Nikon EM.
Where to Find the PDF Manual Online

Accessing the Nikon EM’s user manual in PDF format is readily achievable online. Websites like OrphanCameras.com host a digital library of camera manuals, including the Nikon EM, offering page-by-page viewing and download options. These resources provide a convenient way to consult the manual for quick reference or in-depth study.
Additionally, searching online using keywords like “Nikon EM service manual PDF” will yield various results, including links to downloadable files. Ensure the source is reputable to avoid malware. Having a digital copy allows for easy access on computers, tablets, or smartphones, enhancing your photographic experience.
Orphan Cameras and Other Resources
OrphanCameras.com stands as a valuable repository for classic camera documentation, including the Nikon EM manual, offering a readily accessible online resource. The site provides a page-by-page view of the manual, facilitating easy navigation and information retrieval. Beyond the manual itself, OrphanCameras.com fosters a community of analog photography enthusiasts.
Reddit’s r/AnalogRepair forum also provides a platform for discussion and support, where users share experiences and resources related to Nikon EM repair and maintenance. Exploring these online communities can offer solutions to common issues and connect you with fellow photographers passionate about vintage cameras.