sewing presser feet guide
Sewing Machine Presser Feet Guide
Unlock your sewing machine’s full potential! Discover various presser feet, each designed for specific tasks. From basic seaming to intricate decorative stitches, mastering these tools simplifies projects and enhances creativity. Learn which foot suits each task, ensuring professional-looking results every time.
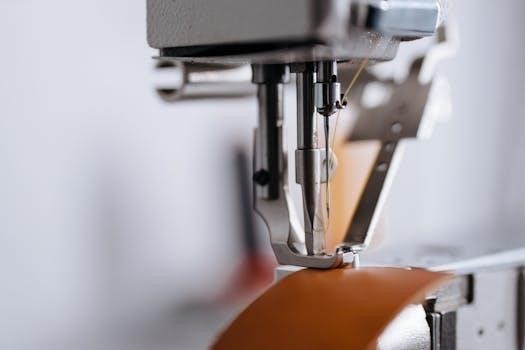
A sewing machine presser foot is an essential attachment that holds fabric in place, ensuring even feeding during stitching. Think of it as the unsung hero guiding your fabric to sewing perfection. Beyond the standard foot, a world of specialized feet awaits, each designed to tackle specific sewing challenges and unlock creative possibilities.
Presser feet aren’t universal; compatibility depends on your machine’s shank height. Knowing your machine is key to selecting the right foot. Changing presser feet is a simple process⁚ raise the needle, release the old foot, align the new one, and snap it into place. It’s a quick skill to master!
From zippers to buttonholes, rolled hems to free-motion quilting, the right presser foot simplifies intricate tasks and elevates your sewing projects. Matching the presser foot to the task at hand is crucial for achieving professional results. Embrace the diverse world of presser feet and watch your sewing skills flourish!
Types of Presser Feet and Their Uses
The world of presser feet is vast, offering specialized tools for various sewing tasks. Understanding their unique functions is key to unlocking your sewing machine’s full potential. From basic utility to advanced techniques, the right presser foot can make all the difference.
The standard foot tackles everyday seams, while the zipper foot navigates close to zipper teeth. Buttonhole feet create perfectly sized buttonholes, and walking feet evenly feed multiple fabric layers. Overcasting feet prevent fraying, and rolled hem feet create neat, narrow hems. Each foot is designed with a specific purpose in mind, ensuring optimal results.
Specialty feet, like the free-motion foot, allow for creative embroidery and quilting. Non-stick feet glide over tricky fabrics like vinyl and leather. By exploring the diverse range of presser feet, you can expand your sewing capabilities and achieve professional-quality finishes. Knowing these tools is the key to sewing success!
Standard/Zig-Zag Foot
The standard foot, often called the zig-zag foot, is the workhorse of your sewing machine. Typically included with the machine, it’s designed for a wide range of general sewing tasks. Its wide opening accommodates both straight and zig-zag stitches, making it incredibly versatile.
This foot excels at basic seaming, topstitching, and edge stitching. The wider stitch setting allows for decorative stitches, too. Many variations exist, but they all share a common feature⁚ a broad space for the needle to move freely. Sewing guides on some models aid in maintaining consistent seam allowances.
Consider it your go-to foot for everyday projects. Whether you’re piecing together fabric, finishing raw edges, or simply need a reliable straight stitch, the standard or zig-zag foot is an indispensable tool. Its adaptability makes it perfect for beginner sewists and experienced crafters alike, a truly essential presser foot.
Zipper Foot
The zipper foot is your essential tool for inserting zippers with precision. Its defining characteristic is its narrow body, designed to allow close stitching along the zipper teeth. Notches on either side of the foot enable you to position the needle on the left or right, accommodating different zipper styles and placements.
This foot is crucial for achieving a professional finish when sewing zippers into garments, bags, or other projects. The narrow design lets you get incredibly close to the zipper teeth, ensuring a secure and aesthetically pleasing closure. Most zipper feet come with pins for use on both sides of the zipper.
For optimal results, ensure the needle is correctly aligned to avoid hitting the zipper teeth. Practice on scrap fabric to get a feel for the foot’s movement. Mastering the zipper foot will elevate your sewing projects, resulting in clean, functional, and visually appealing zipper applications every time.
Buttonhole Foot
Achieving perfectly sized and consistent buttonholes is now simpler than ever with the buttonhole foot. This specialized presser foot streamlines the buttonhole creation process, ensuring a professional finish for your garments. The buttonhole foot typically features a gauge at the back, designed to hold your button securely.
To operate, place the button within the gauge, and the foot will automatically create a buttonhole that matches its size. Follow your sewing machine’s buttonhole settings for optimal results. Some machines offer a 1-step buttonhole foot, considered the most efficient, while others use a 4-step process.
Using a buttonhole foot guarantees uniform buttonholes, eliminating the guesswork and potential for errors. Ensure the fabric is stabilized with interfacing for a clean finish. Whether you’re a beginner or experienced sewist, this foot is a valuable addition to your sewing toolkit, enhancing the quality and appearance of your projects.
Walking Foot
The walking foot, also known as an even feed foot, is essential for sewing multiple layers of fabric or tricky materials like quilt, knit or leather. It ensures all layers feed evenly, preventing shifting and puckering, which leads to straighter, more professional seams.
Unlike standard presser feet that rely on the machine’s feed dogs alone, the walking foot features its own set of feed dogs that grip the top layer of fabric. This dual-feed system moves both the top and bottom layers at the same rate, eliminating slippage and maintaining consistent stitch length. Quilters find this foot invaluable for managing thick batting and multiple fabric layers.
It’s also perfect for handling knit fabrics that stretch easily, and leather, which can stick to a standard foot. The walking foot distributes pressure evenly, resulting in smooth, even seams on various materials. Consider this foot to elevate the results of your sewing projects.
How to Change a Presser Foot
Changing a presser foot on your sewing machine is a simple process that unlocks a world of creative possibilities. First, ensure your machine is turned off or set to prevent accidental operation. Raise the presser foot lever to lift the current foot from the fabric, allowing easy access.
Locate the presser foot release lever or button, typically found at the back of the presser foot attachment. Press or depress this lever to detach the existing foot. Align the new presser foot with the presser bar, ensuring the foot’s pin aligns with the notch on the holder.
Lower the presser foot lever, gently guiding the new foot into place. You should hear a click or snap, indicating secure attachment. Test the new foot by raising and lowering it, ensuring free movement. With practice, changing presser feet becomes second nature, enabling seamless transitions between sewing tasks.
Compatibility of Presser Feet
Understanding presser foot compatibility is crucial for smooth sewing. Not all presser feet fit every sewing machine. The primary factor is the shank height – low or high. Measure the distance from the screw hole to the foot’s bottom when lowered; high shanks are typically around 1 1/4 inches.
Consult your sewing machine’s manual to determine its shank type. Using an incompatible foot can damage your machine or result in improper stitching. While some universal presser foot kits exist, ensuring they match your machine’s shank is essential.
Consider the attachment method; Some feet require specific adapters. Before purchasing, verify the foot’s compatibility with your machine’s make and model. If unsure, consult a sewing machine technician or retailer. Prioritizing compatibility ensures optimal performance and prevents costly repairs.
Specialty Feet for Specific Tasks
Beyond the basics, specialty presser feet unlock advanced sewing techniques. The walking foot excels with thick or layered fabrics, ensuring even feeding and preventing puckering. The rolled hem foot creates delicate, narrow hems effortlessly, perfect for lightweight fabrics like silk.
For precise topstitching, the edge stitching foot offers a guide for consistent seam placement. The gathering foot automates fabric gathering, ideal for ruffles and embellishments. A non-stick Teflon foot handles tricky materials like vinyl or leather without sticking.
Quilters benefit from the quarter-inch foot, ensuring accurate seams for piecing. The free-motion foot allows creative stitching in any direction, perfect for embroidery and quilting designs. Investing in these specialty feet expands your sewing capabilities and elevates project quality.